If you’re just beginning your photography journey, there’s one truth that becomes clear very quickly: light makes or breaks a photograph. It can turn a simple image into a work of art or flatten even the most beautiful scene. Learning to see and shape light is the foundation of every great photographer’s skill set.
This guide introduces the essentials in two main parts — available light and flash — so you can understand how to work with both natural and artificial sources. Along the way, we’ll explore the quality, direction, and colour of light, and learn how to keep colours accurate using white balance.
Part 1: Understanding Available Light
Available light is the light that already exists in your environment — sunlight, window light, or the soft glow of a lamp. It’s free, abundant, and ideal for beginners because it teaches you how to observe and respond to light rather than control it artificially.
The Quality of Light: Soft and Hard
The quality of light describes how it behaves and how shadows appear. Soft light is created when light comes from a large or diffused source, like a cloudy sky, a window with sheer curtains, or a lamp shaded by fabric. It wraps around your subject gently, creating smooth transitions between highlights and shadows. Soft light flatters faces, evens out skin tone, and brings a sense of calm or intimacy to portraits.
Hard light, by contrast, comes from a small, direct source such as the midday sun or a bare bulb. It casts strong, crisp shadows and highlights every texture and detail. Hard light can be striking and dramatic, emphasizing edges and contrast, but it’s less forgiving for portraits. Think of it as the light of clarity and intensity — perfect for architecture, landscapes, or creative effects when you want your image to make a bold statement.
A simple way to remember this is that soft light flatters, and hard light defines.
💡 Key Takeaway:
Soft light smooths and flatters; hard light emphasizes and defines. Learn to choose the one that matches your subject and mood.
The Direction of Light: Front, Side, High, Low, and Behind
Just as important as quality is direction — where the light hits your subject from.

When light comes from in front of your subject, it illuminates everything evenly. This front light reduces shadows and reveals detail, but it can also make your subject look flat because there’s little depth. Rotate slightly to the side, and you’ll see a dramatic change: side lighting creates shadows that sculpt the subject, adding shape and dimension. It’s a favourite for portrait and still-life photography because it brings texture to life.
Light from directly overhead — high light — is common outdoors at midday. It can produce strong downward shadows, especially under the eyes and chin, which makes it challenging for portraits but striking for top-down food or product shots. In contrast, low light (coming from below the subject) creates unusual, even eerie effects, often used in creative or theatrical images.
Finally, backlight — when light comes from behind the subject — can be magical. It creates glowing edges, halos, or even full silhouettes, depending on how you expose the image. Backlight can turn a simple subject into a striking focal point, especially when used at sunrise or sunset.
If you ever feel unsure about your lighting direction, simply move around your subject and observe how the light changes as you shift your viewpoint.
💡 Key Takeaway:
Light direction shapes your photo’s mood. Front light reveals, side light sculpts, and backlight adds drama or silhouette.
The Colour of Light
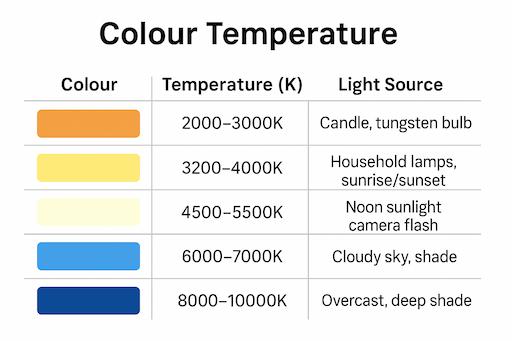
Not all light is “white.” Every light source has its own colour cast, known as its colour temperature, measured in Kelvin (K). Early morning and late afternoon sunlight often appear warm and golden, while midday light looks clean and neutral. On cloudy days or in deep shade, the light turns cooler and slightly blue. Indoor lights also vary — tungsten bulbs give off a rich orange tone, while fluorescent lights may cast a greenish tint.
These colour shifts are what give your photos their mood. Warm light feels inviting and nostalgic, while cooler light feels calm, distant, or even somber.
💡 Key Takeaway:
Light colour affects mood — warm tones feel cozy and human; cool tones feel calm or dramatic.
Correcting Colour with White Balance
Our eyes automatically adjust to different lighting, but cameras need help. That’s where white balance comes in. This setting tells your camera what “white” should look like under different lighting conditions. For example, a white T-shirt might look orange under a lamp unless you select the Tungsten white balance, which cools the image down.
Other settings like Daylight, Cloudy, and Shade each compensate for their respective light types. The Auto setting works well most of the time, but learning to adjust white balance manually gives you greater creative control. You can even experiment — slightly warming an image for a cozy feel or cooling it for a more dramatic tone.
💡 Key Takeaway:
White balance keeps colours true. Use it to correct unwanted colour casts or to enhance the atmosphere creatively.
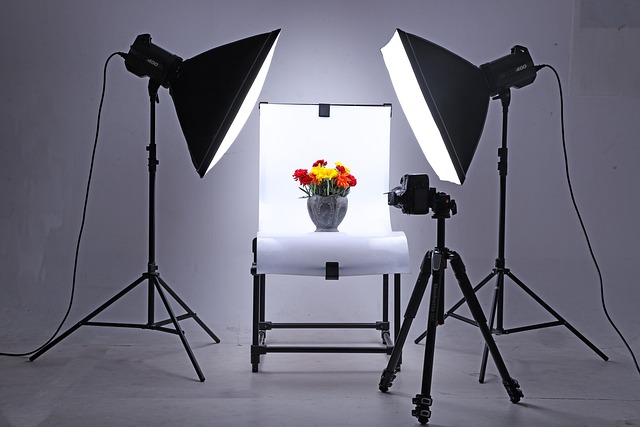
Part 2: Working with Flash

While available light teaches you how to see, flash teaches you how to control. Flash is simply another source of light — one you decide when, where, and how to use. Many beginners avoid it because they associate it with harsh, flat images, but with a few adjustments, flash can look completely natural.
The Quality of Flash Light
The light from a bare flash (especially built-in ones) is small and direct, producing the kind of hard light that causes sharp shadows and red-eye. But once you learn to diffuse or bounce your flash, it becomes one of your most flexible tools. By angling the flash at a ceiling, wall, or using a softbox, you spread and soften the light. This “bounced” or diffused flash mimics the natural look of window light, flattering faces and smoothing out harsh edges.
The difference between bare and bounced flash is like night and day — one screams “snapshot,” while the other feels deliberate and professional.
💡 Key Takeaway:
Diffuse or bounce your flash to turn harsh, artificial light into soft, natural illumination.
The Direction of Flash
Just like sunlight, the direction of flash dramatically changes your image. On-camera flash — where the light comes from the same direction as the lens — gives you even illumination but little depth. By moving your flash off-camera or bouncing it, you can control where shadows fall. Placing the flash to the side creates shape and depth, while positioning it behind your subject can highlight edges, producing a luminous outline known as rim light.
Experimenting with direction helps you understand how artificial light can emulate the natural angles of sunlight — and how creative control over light placement changes a photo’s entire mood.
💡 Key Takeaway:
The direction of flash defines your photo’s depth and drama — move it off-camera or bounce it for professional results.
The Colour of Flash
Most flashes are balanced to match daylight, around 5500K. This means they blend seamlessly with natural sunlight, but not always with indoor or mixed lighting. For instance, if you use flash in a room lit by warm lamps, your subject may appear neutral while the background glows orange. To fix this, photographers use colour gels — thin, coloured filters placed over the flash — to match its colour to the surrounding light. Once the colours are consistent, the image looks balanced and cohesive.
💡 Key Takeaway:
Match your flash’s colour to ambient light using gels or white balance to maintain harmony in mixed lighting.
White Balance with Flash
Modern cameras have a dedicated Flash white balance setting, which assumes a daylight colour temperature. However, when mixing light sources, you may still need to fine-tune. Setting white balance manually or correcting it during post-processing ensures your images look natural. Mastering this step makes your flash photography look polished rather than artificial.
💡 Key Takeaway:
Always check white balance when mixing flash and ambient light — it’s the difference between “harsh flash” and “natural glow.”
Comparing Available Light and Flash
| Aspect | Available Light | Flash Lighting |
|---|---|---|
| Cost | Free and natural | Requires gear but offers control |
| Control | Dependent on time and weather | Adjustable direction and power |
| Quality | Can be soft or hard, depending on conditions | Can be shaped with diffusers and bounce |
| Colour | Changes throughout the day | Usually neutral (daylight balanced) |
| Best Use | Beginners, outdoor portraits, natural scenes | Low light, indoor shoots, creative effects |
💡 Key Takeaway:
Natural light teaches you to see; flash teaches you to control. Understanding both gives you full creative freedom.
Wrapping It Up
Whether you’re working with sunlight through a window or a flash mounted on your camera, the principles are the same: quality, direction, colour, and balance.
Soft light is gentle and forgiving; hard light is bold and dramatic. The direction of light defines form, while colour and white balance set the emotional tone. Once you grasp these ideas, you move from merely taking pictures to shaping light — and that’s where true photography begins.
Beginner’s Lighting Practice Plan
🌓 Available Light
- Soft vs Hard Light
- Take a portrait in direct sun (hard) and in shade (soft).
- Compare shadows and skin tones.
- Direction of Light
- Use a window. Shoot your subject facing the light (front), turned sideways (side), with window behind (backlight).
- Notice how depth and mood change.
- Backlight & Silhouettes
- Shoot at sunset with subject in front of the sun.
- Expose once for subject (background bright), once for background (subject silhouette).
- Colour of Light
- Photograph at sunrise, noon, and in shade.
- Observe how colour temperature shifts.
- White Balance
- Indoors, shoot a white object under a lamp with different WB modes (Auto, Tungsten, Daylight).
- Compare colours.
Flash Light
- Bare Flash vs Bounce
- Shoot with flash straight on.
- Then bounce it off a ceiling.
- Compare harsh vs soft light.
- Flash Direction
- Place a flash to the side, front, and back.
- Notice changes in depth and shadows.
- Flash + Ambient
- In a lamp-lit room, shoot with flash only (background orange).
- Add a gel to flash → subject and background match.
- Freezing Motion
- In dim light, capture a hand wave without flash (blurred) vs with flash (frozen).
- White Balance with Flash
- Use “Daylight” vs “Flash” WB indoors.
- Observe how colours shift.
💡 Key Takeaway:
Practising light hands-on will train your eye faster than any tutorial — shoot, compare, and learn by seeing.
Beginner Photography Lighting Tips: FAQs
1. What is the best light for beginner photographers?
The best light for beginners is natural light — especially during the golden hour (just after sunrise or before sunset). It’s soft, warm, and flattering, making it easier to capture beautiful photos without extra equipment.
2. How can I practice photography lighting at home?
Start simple: use a lamp and a white poster board. Move the lamp around your subject (side, above, behind) and bounce light off the board to see how shadows change. This easy exercise is one of the most effective beginner photography lighting tips for learning fast.
3. What’s the difference between hard light and soft light?
- Hard light creates strong, defined shadows and emphasizes textures.
- Soft light creates gentle shadows, smooths surfaces, and looks flattering on people.
Beginners should experiment with both to understand which fits their subject and style.
4. Do I need expensive equipment to get good lighting?
No! Many beginners achieve great results using natural window light, plus DIY tools like:
- White poster board → reflector
- Sheer fabric → diffuser
- Desk lamp → adjustable light source
You can always upgrade later with LED panels, ring lights, or softboxes.
5. How do I fix bad lighting in photos?
If your photo is too dark, too bright, or the colors look “off,” you can fix it in editing software:
- Adjust exposure to correct brightness.
- Tweak highlights and shadows to recover detail.
- Use white balance to remove strange color casts.
Learning post-processing is an essential beginner photography lighting tip for saving tricky shots.
6. Why is color temperature important in photography?
Color temperature affects the mood of your photo. For example:
- Warm tones (lamps, golden hour) = cozy and inviting.
- Cool tones (cloudy sky, LED) = calm or moody.
Beginners often overlook this, but matching your camera’s white balance to the light source will make your photos look much more professional.